Prawn and Chorizo Linguine

The simplest foods are sometimes the best, this has few ingredients, and is ready in the time it takes to boil a pot of pasta. This prawn and chorizo linguine recipe is so easy to make and tastes fantastic.  If you don’t like prawns you can use chicken instead, it still tastes fantastic!

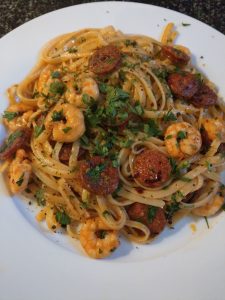
Prawn and Chorizo Linguine Recipe

Ingredients

225g chorizo, slice about 1mm thick
150g fresh, raw prawns
olive oil
2 cloves of garlic, crushed
1/4 tsp smoked paprika
Sprinkle of chilli flakes (optional)
handful of fresh parsley, finely chopped
300g fresh linguine (or 200g dried)

Method

Boil up a large pan of lightly salted water, once boiling add the pasta, and boil until ready. (follow the instructions on the packet)
In a large high sided frying pan, add 3 tbs of olive oil and the sliced chorizo. Cook until all the oil comes out of the chorizo and its starting to go crispy, but not burning.
Add the garlic and smoked paprika and stir until mixed, then chuck in the prawns.
Cook until the prawns are done (they will turn a nice pink colour), then add 3/4 of the parsley and mix thoroughly.
Once the pasta is ready drain it thoroughly and add it to the pan with the prawns and chorizo.
Using cooking tongs mix it all together, ensuring that the prawn and chorizo is mixed into the pasta nice and even
Plate it up, this usually makes 4 portions – depending on how hungry we are, and sprinkle the remaining parsley over the top, along with the chilli flakes if you fancy them – Enjoy 🙂

Gin and Tonic Sorbet Recipe

Whats better than a gin and tonic on a hot day? How about Gin and Tonic Sorbet Recipe!!! This is best made using an ice cream maker, but you can also get by my freezing for half an hour, then shuffling up with a fork, repeating this process until you have a sorbet.

Ingredients

150g Sugar
150ml Water
4 tbs Lemon Juice
3 or 4 shots of Gin
300ml Tonic Water
Lemon Peel to Decorate

Method

If the bowl from your ice cream maker in the freezer the night before so its nice and frozen before you start making this.
Put the sugar, water and lemon juice in a pan and heat until it is all disolved and it starts to resemble a syrup.
Allow to cool a little and add the tonic water.
Allow to fully cool then add your Gin.
Assemble your ice cream maker, add the sorbet mixture and set it to churn. Churn until the sorbet is ready, with mine this takes about 15mins. Depending on your ice cream maker you might need to stick this in a tub and bung it in your freezer for a bit to firm up. If you dont have an ice cream maker, stick the mixture in a tub and put it in the freezer for half an hour. Take it out and mix it thoroughly with a fork. Repeat this process until the sorbet is firmed up and fluffy without and lumps of ice or liquid.

Serve in a glass with lemon peel on top, pour another shot of gin over the top if you are feeling that way 🙂

Smoked trout, parsley and lemon fishcakes

This makes a lovely starter, supper or light lunch, lots of fresh flavours and taste much better than the shop bought frozen fishcakes.

Ingredients

500g potatoes, cooked and mashed (but don’t over cook!)
200g smoked rainbow trout
rind of a large lemon, finely grated
30g parsley, finely chopped
2 eggs, whisked and in a bowl ready.
Plain flour for dusting
breadcrumbs, poured into a bowl and ready
2 or 2 tbs of oil for frying
salt and pepper to taste
salad and dressing to serve (I prefer a mango and chilli dressing with this)

Method

While the mashed potatoes are warm, but not hot, thoroughly mix in the chopped parsley, salt, pepper and lemon rind.
Once mixed flake in the fish, mix again, but dont over mix to the point of the fish being mushed up.
Grab a handful of the mixture, roll into a ball and flatten to about 10mm to 15mm thick. Put on a plate and then do the same with the rest of the mixture. I normally get about 8 fish cakes out of this amount of mixture, but it could be more or less depending on the size of your fish cakes.
Dust each side of the fish cakes with the flour, dip in the whisked egg and then dip in the breadcrumbs until covered. Put back on the plate.
Heat the oil in a frying pan and fry the fish cakes for about 5 minutes either side, until nice and golden.

Serve with a salad and a dressing of your choice.

Chocolate Beermisu Recipe

This is a nice desert that can be knocked up in about 15mins, I prefer to leave it in the fridge to cool for a bit longer though. Although you could use any chocolate beer, the Batemans Mocha beer is the best I have tried. Gorgeous stuff!

Ingredients

12 to 15 sponge fingers
600ml double cream
500g Mascarpone cheese
2 bottles of Batemans mocha beer
dark chocolate and cocoa for dusting

Method

Place the sponge fingers in a deep sided tray/dish in a single layer and pour over 1/3 of a bottle of the Batemans mocha beer. Leave it for a minute or two, then carefully pour out any that hasn’t been soaked into the sponge fingers. Dust with the cocoa and grate some dark chocolate on.
Using a food mixer with the whisking blades attached, pour the double cream into the bowl and whisk until it starts to stiffen. Once this has happened, with the mixer still going, add the cheese a spoonful at a time until it is all added. Then add in rest of the Batemans Mocha beer and mix until it is thoroughly mixed.
Spoon 2/3 of the mixture over the sponge fingers and spread out until its fully covered.
Dust again with the cocoa and grated dark chocolate.
Now, either use a piping bag or a spoon to cover the top again. Just to create a nice pattern on the top.
Once done dust once again cocoa and grated chocolate.
Either server straight away or chill for a bit.

Oh, and the second bottle of beer? Once you have done and stuck it in the fridge, open the bottle, pour it into a glass, sit down and drink it 🙂

Dark Chocolate Cheese Cake Recipe

This is really nice, but very rich – Even I could only handle two or 3 servings in one go 😉

Ingredients

300ml double cream
500g soft cheese
3 tbs cocoa
30g sugar
100g dark chocolate
75g melted butter
14 digestive biscuits, crushed and bashed to bits

Method

Mix the butter with the digestive biscuits, and pour into the bottom of a greased 7″ cake tin. Press down until nice and flat and then stick it in the fridge for an hour or so until it sets.

Add the double cream, soft cheese, cocoa and sugar into a food mixer and whisk until stiff. Grate the dark chocolate into the mixture and whisk again lightly until thoroughly mixed.

Spoon the mixture into the cake tin and stick it in the fridge to chill.

Serve with whipped double cream, cocoa dusting and chocolate source.

Spicy Taco Buns

This are great when you want something filling and tasty. Although I have used taco mince here you could use many other fillings. Chicken and Chorizo also turns out really well.

Ingredients
500g strong white bread flour
2 tsp sugar
1 tsp salt
2 tbs olive oil
7g pack of fast action yeast
300ml luke warm water
Cheddar Cheese
Chilli Flakes
taco mince (as per recipe)

Salsa, Iceberg lettuce and Sweet Potato fries to serve

Method
Put the flour, salt, sugar, yeast, olive oil and water and mix until combined. If using a food mixer mixer do this using the dough hooks until all comes together, then mix for 5 mins and leave to rest for 10. If by hand, knead for about 5 mins and again let it rest. After 10 mins, knock it back and either mix again for 5 mins or knead for 5 mins. Put the mix into a bowl, cover and leave for about an hour until doubled in size.

In the mean time make the taco mince as per the recipe linked in the ingredients (or use left over over taco mince) this is best used warm in the bread, but not hot.

Turn on the oven to about 180c

Once the bread has risen turn it out onto a floured surface and divide into 8, roll these into balls and do the following on each ball, but do this one at a time. Firstly roll them out until they are about 10mm thick. Put about a heaped tablespoon of the taco mince on the middle, top with a small piece of cheese and fold up the edge of the bread over the top until you have a ball shape again (so the bread is stuffed). Place these on a baking tray with the edges you have folder up on the bottom. Repeat with the rest of the bread balls.

Leave for about 15mins.

Next brush the top with milk and sprinkle with grated cheese and chilli flakes

Cook for about 15 mins until the top is nicely done and they sound hollow when the bottom is tapped.

Leave to cool a little, then cut in half. There will be a gap at the top above the mince mixture. Stuff this with salsa and the lettuce.

Serve with mayo and sweet potato fries.

Easy Tomato and Basil Soup

Tomato and basil soup, one of the family’s favourite.

Ingredients (4 servings)
2 400g tins of good quality chopped tomatoes
30g of fresh basil, chopped, stalks and all
1 garlic clove
1 tsp sugar
800ml good quality chicken stock
6 sun dried tomatoes (in olive oil)
Fresh ground black pepper to taste

Method
Add everything to the pan apart from half the basil and the sun dried tomatoes.
Bring to the boil and simmer gently for around 20mins.
Allow to cool a little and then blitz with a hand blender until smooth.
add the sun dried tomatoes and the rest of the basil and blitz again.

pour into bowls and enjoy with some nice bread

Thai Fish Cakes with Sweet Chilli Sauce

Something so fresh about Thai Fish Cakes with Sweet Chilli Dipping Sauce. I will do my own sauce at some point, but for the minute I have just used shop bought stuff.

Ingredients
165g raw king prawns
300g cod loin (or any other firm white fish)
2 or 3 red chillies
2 or 3 spring onions
handful of corriander
1tsp Thai red curry paste
1tsp soy sauce
1tsp fish sauce
Oil for frying
Sweet Chilli Sauce and a salad for serving

Method
Blitz everything together in a food processor until reasonably smooth (but not a mush).
Pre-heat the a few table spoons of oil in a frying pan over a medium heat.
Take a good heaped table spoon at a time, put in the pan and flatten down to around 1cm thick – cook 3 or 4 at a time.
Cook for around 3 to 4 minutes a side until done.
Serve with the side salad and chilli sauce

Enjoy

Tiger Bread, Giraffe Bread (or Dutch Crunch Bread to be correct)

There is something so nice about tiger bread, giraffe bread or dutch crunch – what ever you want to call it. Quite simple to make and not as scary as people think. Although this is best made with a food mixer, it is possible to make it by hand – just increase the proofing time.

Ingredients
500g strong white flour
1 tsp salt
1 tsp sugar
2 tbs toasted sesame oil
1 7g pack of fast action dried yeast
300ml luke warm water

For the topping
5g fast action dried yeast
1/2 tsp sugar
70ml water
2 tsp toasted sesame oil
60g rice flour

Method
Mix all the dry ingredients together, then add the oil and the water.
If using a food mixer use the dough hooks, and mix on a slow to medium speed for about 5 mins. leave for 5 mins to rest and then mix for another 5 mins.
If making by hand, thoroughly mix all the ingredients and turn out onto a floured surface and knead for around 5 minutes, again leave the rest for 5 and then knead again.
Put the bread into a large bowl, cover and leave for around an hour to rise.
While the bread is proofing mix the topping. Again, mix the dry ingredients first, then add the oil and the water. Mix thoroughly with a fork and put to one side. If at any point it looks like the top is going to rise out of the container its in just give it another stir and it will drop back.
When the bread has doubled in size turn it out onto a lightly greased backing tray, knock it back (give it a light knead), and shape it into a tiger bread shape (see pic).
Turn on your oven to 180 degrees C.
Leave the bread for about 30mins to rise again in a warm place
Once the bread has risen the second time, and the oven is hot enough, spread the topping all over the top and sides.
Bake in the oven for around 15 to 20 mins depending on your oven. When its done it will be crunchy on top and sound hollow when you turn it over and tap the bottom.

Let the bread cool before slicing and smothering with butter (this is the part I struggle with, it isnt normally out of the oven long before I am cutting it and eating it)

Best Home Made Vanilla Ice Cream

Can’t beat proper home made ice cream, so much tastier than the shop bought stuff. Might not be healthy, but when it tastes good what do you care 🙂 You really need an ice cream maker to do this, you might be able to do it by sticking it in the freezer and then agitating it every half an hour or so, giving it a good mix, but it wont be as good.

Ingredients
300ml full fat milk
300ml double cream
120g caster sugar
2tsp vanilla extract (can use essence but it wont be as nice)
3 large egg yolks

Method
Firstly if your ice cream maker needs the tubfrozen, stick it in the freezer at least 8hrs before hand.

Mix 60g of the sugar with the double cream, milk and vanilla extract, stick it in a pan and bring it to a boil over a low to medium heat, stirring often.

As soon as the mixture starts to boil it will start to rise up the pan, take it straight off the heat and leave it to cool.Mix the egg yolks and the sugar and stick it in a food mixer. Mix on a high setting until the eggs and the sugar are fully mixed. You can tell when its ready as the colour will be much lighter and it will be a creamy consistency.

Once the cream mixture has cooled, add the egg mixture to the pan, stirring to make sure its fully mixed and stick it back on a low to medium heat, bring it back to a simmer stirring continuously.

Cook until the custard mixture has thickened.

Leave the mixture to cool, stirring often so that the custard doesnt form a skin. Once cool stick it in the fridge until it is nice and cold, usually between 1 and 2 hrs.

Get your ice cream maker ready, take the tub out of the freezer and set it all up.

Pour in the ice cream mixture and set it churning. Run it for about 10 to 15mins (or whatever your ice cream maker recommends)
Some ice cream makers dont fully freeze the ice cream, if this is the case stick it in a container and put it in the freezer for a bit.

Enjoy 🙂